VuePress
# VuePress
VuePress 的优点
- 界面简洁优雅(个人感觉比
HEXO好看) - 容易上手(半小时能搭好整个项目)
- 更好的兼容、扩展
Markdown语法 - 响应式布局,
PC端、手机端 Google Analytics集成- 支持
PWA
# 一、 创建 vuepress 项目(新版)
- 创建
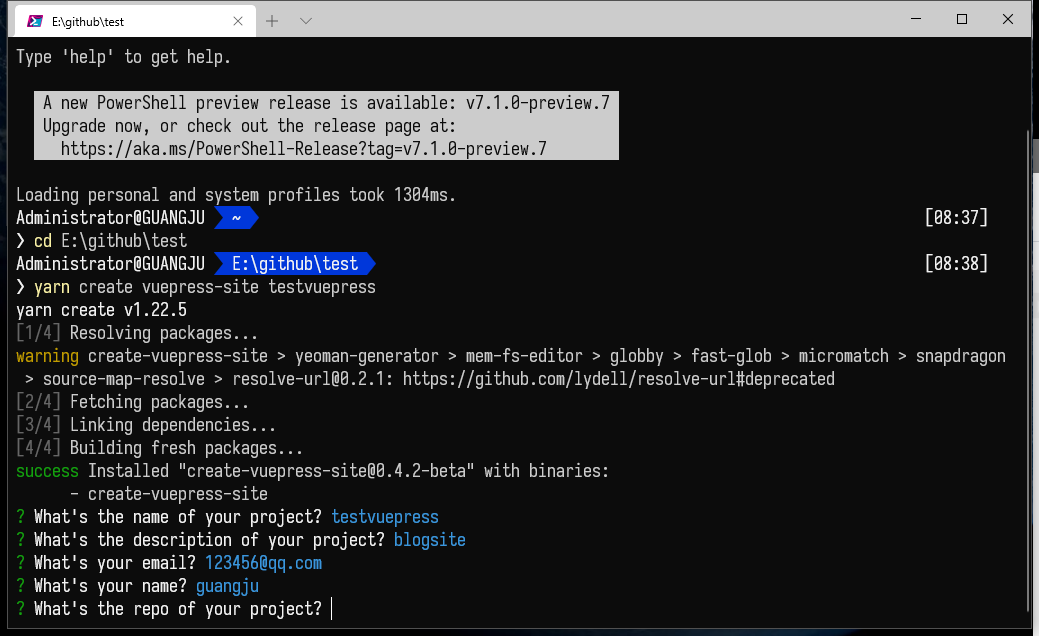
VuePress项目最快的方法是使用create-VuePress-site [Name],帮您建立基本的 VuePress 站点结构,运行:
yarn create vuepress-site [Name]
如果您的项目使用 webpack 3.x,您可能会注意到 npm 的一些安装问题。在这种情况下,我们建议使用yarn
然后你就可以配置你的 VuePress 网站的元数据
Project Name项目名称Description描述Maintainer Email维护者电子邮件Maintainer Name维护人员名称Repository URL存储库 URL(或者没有该项)repo没有可留空
创建完成以后,项目目录是这样的:

- 转到
/docs文件夹下,在命令行里输入:
cd docs
- 安装相关依赖包
yarn
- 运行项目
yarn dev
# 以下是旧版里新建vuepress项目的步骤
旧版里新建`vuepress`项目
# 创建项目
- 全局安装
vuepress。
npm install -g vuepress
- 建立一个文件夹。
mkdir blog
- 生成
package.json文件。
npm init -y
- 创建文件夹和文件 参考下面的目录。
vuepressBlogDemo
       ├─── docs
       │   ├── README.md
       │   └── .vuepress
       │       ├── public
       │       └── config.js
       └── package.json
# 发布
部署到github上托管,具体本页的步骤二
项目根目录,建立文件
deploy.sh创建
github仓库 :username.github.io(username就是你的账号用户名,注意要和用户名一致);gitee仓库:username(username就是你的账户用户名,也就是用用户名创建仓库)发布时候的命令
npm run deploy | yarn deploy //可以在 package.json 的 scripts 中自行设置关键字
- 配置
package.json的scripts脚本命令。
"dev": "vuepress dev docs",
"build": "vuepress build docs"
- 首页配置:
docs/README.md文件,新版框架里式index.md.
初始版本
---
# 默认主题
home: true
# 主页图片地址
heroImage: /javascript.gif
# 主页按钮
actionText: 起步 →
# 主页按钮链接地址
actionLink: /Frontend/HTML/HTML
# 首页里的概述
features:
# 主页小标题及内容
  - title: 简洁至上
    details: 以 Markdown 为中心的项目结构,以最少的配置帮助你专注于写作。
  - title: Vue驱动
    details: 享受 Vue + webpack 的开发体验,在 Markdown 中使用 Vue 组件,同时可以使用 Vue 来开发自定义主题。
  - title: 高性能
    details: VuePress 为每个页面预渲染生成静态的 HTML,同时在页面被加载的时候,将作为 SPA 运行。
footer: MIT Licensed | Copyright © 2018-present Evan You
---
现在使用
---
# 默认主题
home: true
# 主页图片地址
# heroImage: /home-bg.jpg
# 图片自定义和格式
# bgImage: '/bg.png'
# bgImageStyle: {
#   height: '350px'
# }
# 主页按钮
actionText: About Me
# 主页按钮链接地址
actionLink: /About/
features:
# 主页小标题及内容

# footer:  Copyright © 2020 | guangju's blog | 91guangju.com

---

# 文章链接

- [我的博客地址](http://www.91guangju.com/)
建立静态资源目录
public。(没有需要,可以不创建).vuepress/public用来存放图片视频等公共文件。配置文件
config.js。在
docs/.vuepress/config.js文件中配置网站标题、描述、主题等信息
module.exports = {
  title: 'Hello VuePress',
  description: '我的个人网站'
};
- 配置导航 在
.vuepress/config.js,可以下拉的导航使用的items。
themeConfig: {
  nav: [
    { text: '首页', link: '/' },
    { text: 'web', link: '/web/' },
    {
      text: 'js',
      items: [{ text: 'js基础', link: /js/ }, { text: 'js高级', link: /jsg/ }]
    }
  ];
}
让导航可以使用
文件位置
docs/web/README.md对应的就是web分类下的默认文档(默认就是README.md),也就是用这个配置{ text: 'web', link: '/web/' },让页面生效。一级的侧边栏配置, 对应的路径就是
docs下面的文件夹
sidebar: ['/', '/web/', '/js/', '/vue/'];
- 侧边栏的分组
  {
     title: 'vue学习',
     collapsable: true,
     children: ['/vuex/', '/props/']
  }
config.js文件的大致内容,当然可以参考官网丰富内容
module.exports = {
  title: 'guangju\'s blog', // \'是为了转译引号,title可以自己取名
  description: '我的个人网站',
  head: [ // 注入到当前页面的 HTML <head> 中的标签
    ['link', { rel: 'icon', href: '/logo.jpg' }], // 增加一个自定义的 favicon(网页标签的图标)
  ],
  base: '/', // 这是部署到github相关的配置
  markdown: {
    lineNumbers: false // 代码块显示行号
  },
  themeConfig: {
    nav:[ // 导航栏配置
      {text: '前端基础', link: '/accumulate/' },
      {text: '算法题库', link: '/algorithm/'},
      {text: '微博', link: 'https://weibo.com'}
    ],
    sidebar: 'auto', // 侧边栏配置
    sidebarDepth: 2, // 侧边栏显示2级
  }
};
完成了基础搭建后,就可以在docs目录下新建 .md 文件写文章了,至此,可以在本地运行了。
# 我的 vuepress 的 config.js 文件
config.js
module.exports = {
    // 主页图片下第一行字、标题栏名称、左上角名称
    title: "GuangJu'S NoteBook",
    // 主页图片下第二行字
    description: '欢迎,大爷儿来玩~',
    // 端口配置 80是默认端口(手动部署服务器时用)
    // port: 80,
    theme: 'reco', //启动主题 已安装的有  默认 / reco
    // 标题栏图标
    head: [
        // 改变title的图标,图标放在public文件夹中,herf后直接 '/图片.格式' ,不要./
        [
            'link',
            {
                rel: 'icon',
                href: '/linktolink.png',//图片放在.vuepress/public文件夹下,直接'/图片名 '
            },
        ],
        // 在移动端,搜索框在获得焦点时会放大,并且在失去焦点后可以左右滚动,这可以通过设置元来优化。
        ['meta',
            {
                name: 'viewport',
                content: 'width=device-width,initial-scale=1,user-scalable=no'
            }]
    ],
    // 主题使用的插件的设置
    plugins: [

        [
            // 看板娘
            "@vuepress-reco/vuepress-plugin-kan-ban-niang",
            {
                theme: ['shizuku', 'wanko', 'haruto', 'blackCat', 'whiteCat', 'haru1', 'haru2', 'koharu', 'izumi', 'shizuku', 'miku', 'z16'],
                clean: false,
                messages: {
                    welcome: '我是guangju欢迎你的关注 ',
                    home: '心里的花,想要带你回家.',
                    theme: '好吧,希望你能喜欢其他小伙伴!',
                    close: '那再见了哦~'
                }
            }
        ],
        [
            // 彩带
            "ribbon",
            {
                size: 60,     // width of the ribbon, default: 90
                opacity: 0.4, // opacity of the ribbon, default: 0.3
                zIndex: -1    // z-index property of the background, default: -1
            }
        ],
        [
            // 打赏
            'vuepress-plugin-sponsor',
            {
                theme: 'simple', // Drinks  \ simple
                alipay: 'https://pic.downk.cc/item/5e8c52cf504f4bcb0412ad6f.png',
                wechat: 'https://pic.downk.cc/item/5e9fa35fc2a9a83be5281f0e.png',
                // qq: '',
                // paypal: '',
                duration: 2000
            }
        ],
        // 未启用
        // [
        //     // 公告窗
        //     "@vuepress-yard/vuepress-plugin-window",
        //     {
        //         title: "公告",
        //         windowStyle: { left: '41%', top: '100px', width: '260px', },
        //         contentInfo: {
        //             title: '🎉扫码加公众号或加QQ群1126566195',
        //             imgUrl: 'https://pic.downk.cc/item/5eab8845c2a9a83be5f67837.png',
        //             needImg: true,
        //             content: '公众号 比邻之地',
        //             contentStyle: {}
        //         },
        //         bottomInfo: {
        //             btnText: 'Blog',
        //             linkTo: 'http://www.91guangju.com'
        //         },
        //         closeOnce: true
        //     }
        // ]
    ],
    // 主题设置
    themeConfig: {
        // 主题样式
        type: 'blog',
        // 右侧头像
        authorAvatar: '/headimg.jpeg',
        // 代码显示样式
        codeTheme: 'solarizedlight', // 'funky' \ 'okaidia' \ 'solarizedlight' \ 'tomorrow'
        // valine 评论设置
        valineConfig: {
            appId: 'HphnXJO6NChHtY50Di9q039D-MdYXbMMI',// your appId
            appKey: 'eGw2p5VfR348442nSkdL3ta6', // your appKey
        },
        // 分类和标签导航
        blogConfig: {
            // category: {
            //     location: 2,     // 在导航栏菜单中所占的位置,默认2
            //     text: '分类' // 默认文案 “分类”
            // },
            tag: {
                location: 2,     // 在导航栏菜单中所占的位置,默认3
                text: '标签'      // 默认文案 “标签”
            },
        },
        //侧边栏自动显示当前激活页面中标题的链接?
        // sidebarDepth: 2,

        // 允许你获取每个文件的最后一次 git 提交的 UNIX 时间戳(ms)
        lastUpdated: 'Last Updated',

        //显示所有页面的标题链接
        displayAllHeaders: true,// 默认值:false

        //设置导航栏禁用(navbar固定写法) navbar:false

        // navbar: false,

        // nav导航栏设置
        nav: [
            // 每个{}中是导航选项,link可以跳转其他路由,或者链接
            {
                text: '首页',
                link: '/',
                icon: 'reco-home'
            },
            // 同上,但是还可以设置成有下拉功能的子选项
            {
                text: '前端基础',
                icon: "reco-category",
                items: [
                    { text: 'HTML & H5', link: '/Frontend/HTML/HTML' },
                    { text: 'CSS & C3', link: '/Frontend/CSS/css1', },
                    { text: 'CSS 教程', link: '/Frontend/CSS2/css1' },
                    { text: 'JavaScript', link: '/Frontend/JS/js1' },
                    { text: 'ES6', link: '/Frontend/ES6/ES01' },
                    { text: 'Promise', link: '/Frontend/Promise/promise' },
                    { text: 'JQuery', link: '/Frontend/JQuery/JQuery' },
                    { text: 'Ajax', link: '/Frontend/Ajax/Ajax' },
                    { text: 'Axios', link: '/Frontend/Axios/axios' },
                    { text: 'Webpack4.0', link: '/Webpack/webpack1' },
                    { text: 'node.js', link: '/Node/node1' },
                ]
            },
            {
                text: '前端框架',
                icon: "reco-document",
                items: [
                    { text: 'Vue', link: '/Framework/Vue/vue01' },
                    { text: 'React', link: '/Framework/React/React01' },
                    { text: 'Wechat', link: '/Framework/Wechat/Wechat' }
                ]
            },
            //后端,暂未启用
            {
                text: '后端技术',
                items: [
                    // { text: 'JAVA 的了解', link: '/Backend/JAVA' },
                    { text: 'Linux', link: '/Linux/centos' },
                    { text: 'MongoDB', link: '/Backend/mongodb1' },
                    { text: 'Api', link: '/Backend/api' },
                ],
            },
            {
                text: '工具',
                items: [
                    { text: 'git', link: '/Tools/git' },
                    { text: 'yarn', link: '/Tools/yarn' },
                    { text: 'npm', link: '/Tools/npm' },
                    { text: 'cmd', link: '/Tools/cmd' },
                    { text: 'nrm', link: '/Tools/nrm' },
                    { text: 'serve', link: '/Tools/serve' },
                    { text: 'MarkDown', link: '/Tools/markdown' },
                    { text: 'Terminal', link: '/Tools/terminal' },
                    { text: 'Trojan', link: '/Tools/Trojan' },
                    { text: 'vite', link: '/Tools/vite' },
                    { text: 'vuepress', link: '/Tools/vuepress' },
                    { text: '升级依赖包', link: '/Tools/upgrade' },
                    { text: 'regex 正则', link: '/Tools/regex' },
                    { text: 'Typecho 安装建站', link: '/Tools/typecho' },
                    { text: 'Eslint 的使用和禁用', link: '/Tools/Eslint' },
                    { text: 'VScode等配置文件', link: '/Tools/vscode' },
                    { text: 'Win子系统', link: '/Tools/wsl' },
                ],
            },
            {
                text: '小知识',
                items: [
                    { text: '项目总结', link: '/Project/shopingapp' },
                    { text: '学习内容', link: '/Other/' },
                    { text: '知识点', link: '/Other/知识点' },
                    { text: '面试题', link: '/Other/面试题' },
                    { text: 'export区别', link: '/Other/export' },
                    { text: '变量常用名', link: '/Other/name' },
                    { text: '问题', link: '/Other/问题' },
                    { text: 'token 是什么', link: '/Other/token' },
                    { text: '网站黑白', link: '/Other/网站黑白' },
                    { text: 'Chrome 使用', link: '/Other/Chrome' },
                    { text: '浏览器和内核', link: '/Other/浏览器内核' },
                    { text: 'URI & URL', link: '/Other/URI&URL' },
                    { text: 'Apache 是什么', link: '/Other/Apache' },
                    { text: 'Nginx 是什么', link: '/Other/Nginx' },
                    { text: '报 error 的本质和处理', link: '/Other/error' },
                    { text: '验证码 是什么', link: '/Other/验证码' },
                ]
            },
            {
                text: 'Timeline',
                link: '/timeline/',
                icon: 'reco-date'
            },
            {
                text: '留言',
                link: '/messages/',
                icon: 'reco-suggestion'
            },
            {
                text: '关于',
                link: '/About/'
            },
            // {
            //     text: 'Github',
            //     link: 'https://github.com/ZGuangJu'
            // },
        ],
        // 侧边导航设置
        // sidebar: auto,// 自动生成侧栏 /运行项目报错???
        sidebar: {
            // 侧边导航栏内容
            '/Frontend/': [
                {
                    title: 'HTML',
                    collapsable: true, //是否折叠侧边栏
                    children: ['HTML/HTML']
                },
                {
                    title: 'CSS',
                    collapsable: true,//是否折叠侧边栏
                    children: ['CSS/css1', 'CSS/css2', 'CSS/css3', 'CSS/css4', 'CSS/css5', 'CSS/css6', 'CSS/css7', 'CSS/css8', 'CSS/css9', 'CSS/css10', 'CSS/css11', 'CSS/css12']
                },
                {
                    title: 'CSS教程',
                    collapsable: true,//是否折叠侧边栏
                    children: ['CSS2/css0', 'CSS2/css1', 'CSS2/css3', 'CSS2/css4', 'CSS2/css5', 'CSS2/css6', 'CSS2/css7', 'CSS2/css8', 'CSS2/css9', 'CSS2/css10', 'CSS2/css11', 'CSS2/css12']
                },
                {
                    title: 'JavaScript',
                    collapsable: true, //是否折叠侧边栏
                    children: ['JS/js1', 'JS/js2', 'JS/js3', 'JS/js4', 'JS/js5', 'JS/js6', 'JS/js7', 'JS/Array']
                },
                {
                    title: 'ES6',
                    collapsable: true, //是否折叠侧边栏
                    children: ['ES6/ES01', 'ES6/ES02', 'ES6/ES03', 'ES6/ES04', 'ES6/ES05']
                },
                {
                    title: 'Promise',
                    collapsable: true, //是否折叠侧边栏
                    children: ['Promise/promise', 'Promise/promise2', 'Promise/promise3']
                },
                {
                    title: 'JQuery',
                    collapsable: true, //是否折叠侧边栏
                    children: ['JQuery/JQuery', 'JQuery/JQuery2', 'JQuery/JQuery3', 'JQuery/JQuery4']
                },
                {
                    title: 'Ajax',
                    collapsable: true, //是否折叠侧边栏
                    children: ['Ajax/Ajax']
                },
                {
                    title: 'Axios',
                    collapsable: true, //是否折叠侧边栏
                    children: ['Axios/axios', 'Axios/axios2', 'Axios/axios3', 'Axios/axios4', 'Axios/axios5']
                },
            ],
            '/Framework/Vue/': [
                {
                    title: 'Vue',
                    collapsable: true, //是否折叠侧边栏
                    children: ['vue3-1', 'vue01', 'vue02', 'vue03', 'vue04', 'vue05', 'vue06', 'vue07', 'vue08', 'vue09', 'vue10', 'vue11', 'vuers-1', 'vuers-2', 'vuers-3']
                }
            ],
            '/Framework/React/': [
                {
                    title: 'React',
                    collapsable: true, //是否折叠侧边栏
                    children: ['react01', 'react02', 'react03', 'react04', 'react05', 'react06', 'react07', 'react08', 'react09', 'react10', 'react11', 'react12', 'react13', 'react14', 'react&vue', 'react', 'router_doc']
                },
            ],
            '/Framework/Wechat/': [
                {
                    title: '微信小程序',
                    collapsable: true, //是否折叠侧边栏
                    children: ['wechat', 'wechat2', 'wechat3', 'wechat4', 'wechat5', 'wechat6', 'wechat7', 'wechat8', 'wechat9', 'wechat10', 'wechat11', 'wechat12']
                }
            ],
            // 项目
            '/Project/': ['shopingapp', 'admin', 'project', 'todolist'],
            '/Node/': ['node1', 'node2', 'package'],
            '/Webpack/': ['webpack1', 'webpack2', 'webpackconfigjs'],
            // 后端
            '/Backend/': ['mongodb1', 'mongodb2', 'mongodb3', 'mongodb4', 'mongodb5', 'api'],
            '/Linux/': ['centos', 'screen', '宝塔', 'vim'],
            // 工具
            '/Tools/': ['git', 'yarn', 'npm', 'cmd', 'nrm', 'serve', 'markdown', 'terminal', 'Trojan', 'vite', 'vuepress', 'upgrade', 'regex', 'typecho', 'Eslint', 'vscode', 'wsl'],
            //小知识
            '/Other/': [
                '', '问题', 'error', '知识点', '面试题', 'export', 'name', '网站黑白', 'token', 'URI&URL', 'Apache', 'Nginx', 'Chrome', '验证码'
            ],
        },
        // 友链
        friendLink: [
            {
                title: '我的博客',
                desc: '我的博客地址.',
                email: "guangju@126.com",//可用头像地址替换
                link: 'http://www.91guangju.com'
            }
            // ...
        ],
        // markdown设置
        markdown: {
            // 显示代码块行号
            lineNumbers: true
        },
        // search: false, //禁用内置搜索框
        searchMaxSuggestions: 20,//调整搜索框显示的搜索提示数量
        // 假定 GitHub。也可以是一个完整的 GitLab URL。

        // repo: 'https://github.com/ZGuangJu/ZGuangJu.github.io',
        // 自定义项目仓库链接文字

        // 默认根据 `themeConfig.repo` 中的 URL 来自动匹配是 "GitHub"/"GitLab"/"Bitbucket" 中的哪个,如果不设置时是 "Source"。
        // repoLabel: '贡献代码!',

        // 以下为可选的 "Edit this page" 链接选项
        // 如果你的文档和项目位于不同仓库:
        docsRepo: 'vuejs/vuepress',
        // 如果你的文档不在仓库的根目录下:
        docsDir: 'docs',
        // 如果你的文档在某个特定的分支(默认是 'master' 分支):
        docsBranch: 'master',
        // 默认为 false,设置为 true 来启用
        editLinks: false,
        // 自定义编辑链接的文本。默认是 "Edit this page"
        editLinkText: '帮助我们改进页面!',
        // 备案信息
        record: '京ICP备2020044651号-1',
        recordLink: 'http://beian.miit.gov.cn/',
        // cyberSecurityRecord: '公安部备案文案',
        // cyberSecurityLink: '公安部备案指向链接',
        // 项目开始时间,只填写年份
        startYear: '2017',
        // author
        author: 'GuangJu',
        //导航栏左侧可以显示logo
        // logo: '/head.png',
        // 替换首页的 faceImage 来设置头像
        // authorAvatar: '/avatar.png'
    }
}
# 在原有项目中添加vuepress
- 在项目中安装
vuepress
yarn add vuepress -D
- 创建你的第一个文档
mkdir docs && echo '# Hello VuePress' > docs/README.md
- 添加一些脚本到
package.json
{
  "scripts": {
    "docs:dev": "vuepress dev docs",
    "docs:build": "vuepress build docs"
  }
}
- 运行项目
yarn docs:dev
# 二、 vuepress部署到github或gitee
部署到github或gitee只在创建仓库名时有区别,其他基本一样的。
# 部署到 Github
打开 github 网站,登陆自己的 github 账号
接着新建两个仓库:
# 新建仓库一
USERNAME.github.io(不用克隆到本地,同时这个是你输入地址栏的访问博客地址)USERNAME必须是你Github的账号用户名注意:新建
github仓库时,创建的分支必须是master,用main会失败(或者下面deploy.sh文档中的仓库分支由master为main,总之要统一,至于github为什么改变默认的分支名称,这就是另一个故事了,请自行百度)。
 这个仓库建好后,不用克隆到本地,内容更新修改都在下面的仓库(本地的)中进行。
# 新建仓库二
随便起名字,比如:
Blog(这个要克隆到本地或者从本地直接远程提交代码,用来保存源代码)没有创建
vuepress项目的,使用git,将 vuepress-tools (opens new window) 中的内容拷贝到 Blog 文件夹中(里面是vuepress模板)或参考这里 (opens new window)自己创建vuepress项目如果自己创建的
vuepress,要在项目根目录下创建.gitignore文件和deploy.sh文件
.gitignore文件内容
# git提交时筛选文件用
node_modules
docs/.vuepress/theme
docs/.vuepress/dist
deploy.sh文件内容
#!/usr/bin/env sh

# 确保脚本抛出遇到的错误
set -e

# 1、生成静态文件
npm run build

# 2、进入生成的文件夹
cd docs/.vuepress/dist

# 3、提交
# 如果是发布到自定义域名
# echo 'www.yourwebsite.com' > CNAME

git init
git add -A
git commit -m 'deploy-updata!'

# 3-1、提交到github和gitee仓库仓库中

# 如果想用username.gitee.io或者username.github.io访问你的网站,必须让新建的仓库地址和你的用户名一致!!

# A 执行提交到github仓库的master中(USERNAME是你的仓库名)
# 如果你想要部署到 https://USERNAME.github.io
# B 如果发布到 https://USERNAME.github.io/<REPO>  REPO=github上的项目

# 提交到github
git push -f git@github.com:ZGuangJu/ZGuangJu.github.io.git master
# 提交到gitee
git push -f git@gitee.com:zguangju/ZGuangJu.git master

# 提交静态文件到部署的仓库结束
# 开始提交源码
cd D:/github/blog-vuepress
git add .
git commit -m '又提交了!'
git push origin master
# 提交源码到github结束
git push -f git@gitee.com:zguangju/vuepress-blog.git master
# 提交源码到gitee结束
# 结束
说明:
git push -f [你要部署的github仓库地址] master
git push -f [你要部署的gitee仓库地址] master
master: 是你的分支名,以前github默认都是master但是现在更改为main了,请注意。
同时部署到github和gitee上时,因为要调用git提交,而使用git又要设置username和email所以github和gitee最好用同样的用户名和邮箱git提交就不会提示输入用户名和邮箱了,设置一次git可以通用两个网站。
我的deploy.sh文件
#!/usr/bin/env sh

# 确保脚本抛出遇到的错误
set -e

# 1、生成静态文件
npm run build

# 2、进入生成的文件夹
cd docs/.vuepress/dist

# 如果是发布到自定义域名
# echo 'www.yourwebsite.com' > CNAME

# 3、提交
git init
git add -A
git commit -m 'deploy-updata'

# 3-1、提交到github和gitee仓库仓库中

# 如果想用username.gitee.io或者username.github.io访问你的网站,必须让新建的仓库地址和你的用户名一致!!

# A 执行提交到github仓库的master中(USERNAME是你的仓库名)
# 如果你想要部署到 https://USERNAME.github.io
# B 如果发布到 https://USERNAME.github.io/<REPO>  REPO=github上的项目

# 提交到github和gitee
git push -f git@github.com:ZGuangJu/ZGuangJu.github.io.git master

git push -f git@gitee.com:zguangju/ZGuangJu.git master

# 提交到仓库

cd E:/github/blog-vuepress
git add .
git commit -m 'update'
git push origin master

# 结束
我的配置是可以一键部署到gitee和github两个网站, 并把项目源代码提交到github仓库上了。
用http://zguangju.gitee.io/和https://zguangju.github.io/都能登录我的博客。
以上配置内容是参考vuepress官网,仅供参考
- 在
package.json文件的scripts中添加下面的代码
"scripts": {
  "deploy": "bash deploy.sh"
}
- 在本地项目目录打开
cmd或powershell终端中运行
npm run deploy
注
npm run deploy这一步,报错bash不是内部或外部命令,导致一直不成功把bash改为start试试或者把bash添加环境变量。
不使用bash 也可以使用.bat文件运行脚本,脚本命令是不同的。如果有不懂的可以评论或者联系我!
出现以下内容代表运行OK


开启仓库项目中的
github Pages服务在浏览器输入
https://你用户名.github.io/即可看到自己的主页
# 部署到gitee上
- 部署
gitee上时,新建的gitee仓库名:username(username就是你的账户用户名,也就是用用户名创建仓库), - 和
github一样,提交项目后,仓库也要开启gitee Pages,从项目页找服务=>gitee Pages,点击部署。 gitee和github不同的是,你在github上更新内容时,不用任何操作,网址会自动更新成新的内容(通常提交后等几分钟即可);gietee每次都要手动,在gitee Pages中点击更新按钮,才会更新到最新内容。
# 部署到自己的域名上(要有自己的域名啊)
- 找到购买域名的网站,进入管理后台,点击
解析按钮,添加下面两条内容:

- 在 万网 购买域名的同学请注意,第二条记录中的 请用 @ 代替,万网不支持

IP 可以通过
ping自己的域名得到:添加
CNAME文件
在仓库 USERNAME.github.io 中找到 Settings > Custom domain 把 www.91guangju.com (你的域名) 添加进去即可。

# 其他方式
手动或者用
ftp工具传到你的服务器上完成后,在地址栏输入自己的域名 看一下吧
# 报错的问题
# 运行 yarn build 报错
FATAL ERROR: Ineffective mark-compacts near heap limit Allocation failed - JavaScript heap out of memory
原因是 JavaScript堆内存不足,Node 是基于V8引擎,在 Node 中通过 JavaScript 使用内存时只能使用部分内存(64位系统下约为1.4 GB),如果内存不足,可以用下面方法来放宽V8默认的内存限制。
- 方法一:添加参数
--max_old_space_size=4096
npm run start --max_old_space_size=4096
- 方法二:通过
increase-memory-limit插件
安装插件:npm install -g increase-memory-limit
执行命令:npx cross-env LIMIT=4096 increase-memory-limit
通过 log 可以发现它会将所有执行 node 命令的地方加上--max-old-space-size=4096 参数
# VitePress 是 VuePress 的下一代框架
VuePress应该有人用过,而 VitePress 是 VuePress 的下一代框架 ,是支持vue 3.0 的web网站框架。
在它的文档中被称为 Vuepress 的兄弟,对比有一些优势,我觉的主要是启动速度快!
- 基于
Vite而不是Webpack所以更快的启动时间,热重载等 - 使用
Vue3来减少JS的有效负载
# 创建
- 首先,我们要做的第一件事就是创建目录。
mkdir blog-vitepress
cd blog-vitepress
- 初始化
package.json,并安装viteppress
npm init
npm i --save-dev vitepress
- 将
VitePress脚本添加到package.json文件中。
"scripts": {
  "dev": "vitepress dev docs --open",
  "build": "vitepress build docs",
  "serve": "vitepress serve docs"
},
- 根目录下创建
docs文件夹,并创建第一个md文件(这个是网站首页的配置和内容),可以用命令行或在文件夹手动创建。
mkdir docs
echo '# Hello World' > docs/index.md
- 启动项目
npm run dev
到这里,最基本的项目搭建好了
# 简单配置
添加一些导航到我们的网站侧边栏和导航栏。创建一个配置文件,在docs中新建一个.vitepress文件夹,里面创建一个config.js文件
// vitepress/config.js
module.exports = {
    title: "GuangJu's Blog",// 网站标题
    description: '我的vitepress博客.', //网站描述
    base: '/', //  部署时的路径 默认 /  可以使用二级地址 /base/
    // lang: 'en-US', //语言
    repo: 'vuejs/vitepress',
    head: [
        // 改变title的图标
        [
            'link',
            {
                rel: 'icon',
                href: '/img/linktolink.png',//图片放在public文件夹下
            },
        ],
    ],
    // 主题配置
    themeConfig: {
        //   头部导航
        nav: [
            { text: '首页', link: '/' },
            { text: '关于', link: '/about/' },
        ],
        //   侧边导航
        sidebar: [
            { text: '我的', link: '/mine/' }
        ]
    }
}
这时的项目结构:
vitepress
    │
    ├─── docs
    │     │
    │     ├── .vuepress
    │     │     └── config.js
    │     ├── public
    │     ├── about
    │     │     └── index.js
    │     ├── mine
    │     │     └── index.js
    │     └── index.md
    └── package.json
项目基本创建好了,可以根据自己的需要,自定义其他目录。
vitepress 刚出来没多久,功能还正在完善,也就是说还有好多不支持的东西,正式版发布后,我也会更新。